HotActionsLive
Introduction
Thank you for purchasing our product! You've got a system that is ready for operation.
The HotActions Live application included in the software package of the virtual studio is a medium for interactive control of 3D scene and media streams in real time. The software application is mainly designed to record different television programs with the participation of one or several actors placed at the background of 3D computer scenery.
This document contains full information on the use of all functions of this application for the creation of television products. The version of the document (3.0) corresponds to the HotActions Live 3.0 software.
- Let's note that the HotActions Live application is a "player" of projects with an option to change their parameters (if it is provided for at the stage of project development). A full-fledged project containing the required video- and audio materials, a 3D synthesized scene and means of control of its virtual objects is created in the full version of the HotActions 3.0 application (HotActions Full).
Studio Performance Check
This chapter describes how to check the studio performance in several steps by means of the НotActions Live application.
Equipment Connection
It is necessary to connect video- and audio equipment and to set the parameters of input and output video and sound for the virtual studio to fully function (for the shooting to be carried out). Please refer to FOCUS Hardware Configurations 3.01 for the necessary hardware connections.
The tuning of video and sound is described in FOCUS Video Tuning 3.01 and FOCUS Audio Tuning 3.01.
The video output parameters such as television standard (PAL or NTSC) and the output signal type should be correctly adjusted by each user. If the studio operation mode is not changed in the future, it is not required to change the output video parameters any more, as a rule.
It is usually required to reset video input parameters after the configuration of the external equipment (video cameras) is changed. It may be necessary to adjust the parameters of keying (rear projection), when light in the shooting studio changes, for example. An example of configuring the input and output video is given in the document on video tuning.
HotActions Live Application Launch
After the preliminary setting of parameters of input video signals boards, it is possible to get down to work with the main control application of the virtual studio – HotActions Live. It is launched from the "Start" menu or with a double click on the HotActions Live ![]() icon on the Windows desktop.
icon on the Windows desktop.
Before launching this application it is necessary to connect the HASP key to the USB port of the PC (the HASPUserSetup.exe software of access to it should be installed in the operating system). A message that it is necessary to have such key in the system will otherwise appear in launching the application.
After the loading of the HotActions Live application is completed, we can see its main window. If the application is launched foe the first time, this window is empty.
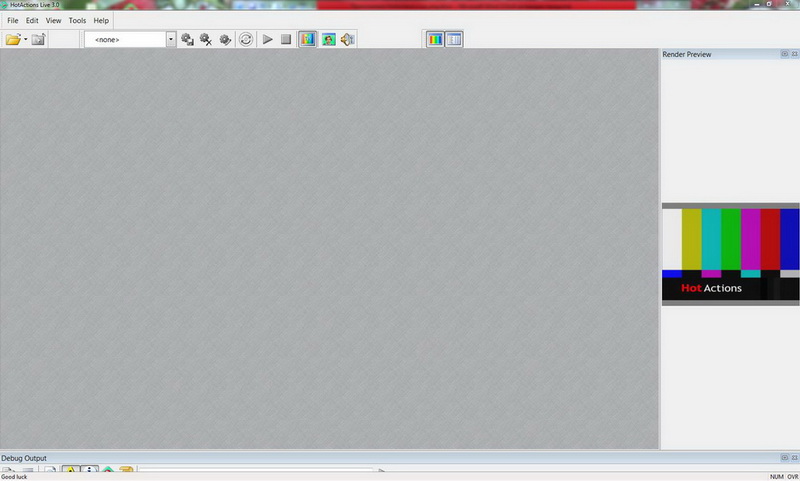
The main window is placed on the main monitor of the PC by default, and the output of the resulting video image (TV-output) is to the monitor connected to the video image output device (FDxxx board or DVM62 converter) in the full screen mode. The TV-output image is doubled in a separate child window of the application – in the Render Preview pane.
If a project is not loaded, this image is the PAL color pattern.
Project Opening and TV Output Control
It is necessary to load a project to check the performance of the virtual studio.
To load a project, click the leftmost button in the upper part of the application Open File ![]() , and then in the file opening dialog choose any standard project from the package supplied with the application. The projects package is installed in the D:/Focus/Examples folder by default.
, and then in the file opening dialog choose any standard project from the package supplied with the application. The projects package is installed in the D:/Focus/Examples folder by default.
It usually takes a few seconds to load a project. If the project is loaded correctly, a 3D scene is displayed on the TV-output monitor and in the Render Preview window. If all video inputs and outputs are connected correctly, the real camera is pointed at the Actor, and the keying is set, an image of this Actor can be seen within the 3D scene.
- An Actor is a person shot by a real camera at the green/blue background, the image of which is placed in the virtual space of the synthesized 3D scene.
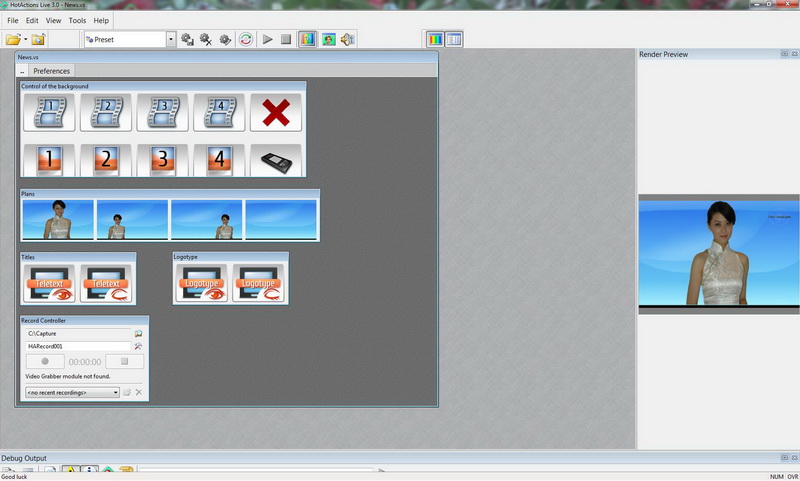
Work with the project and scene control are described in detail in a chapter of this document. But it is necessary to discuss the basic used terms before starting the detailed operation with the virtual studio in the HotActions Live application.
Basic Terms
Project
Project is a manager of media documents and other data, to which a 3D scene, images, video and audio materials, text documents, etc. belong. In addition, the project contains interactive scene controls (controllers), information on the window layout, options, presets, etc.
The project files can be of the following types:
- Standard project (*.vs). Media files that are used in such project are placed in the folder of the project, as a rule. Let's note that some media files can be located in the other places, for example, if they are used in several projects.
- Encrypted project (*.vsc). As a rule, it is used if the project is commercial and created for special users having a corresponding USB key for the decryption of the data.
- Packed project (*.vsz). It is an archive into which the project file and the used media files (all or part of them) are packed. All or some of the packed files can be encrypted. In the simplest case, only one file can be in the folder of such project.
Only one project can be loaded in the HotActions Live application. The current project is closed in attempting to load the next project.
Three-Dimensional Scene and Render
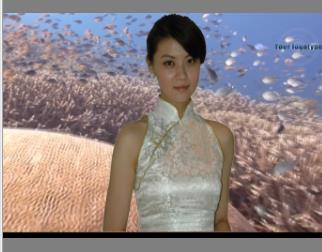
Three-dimensional scene (3D scene) in the virtual studio is the main type of graphic media and is a thematic collection of synthesized 3D objects (some of which contain animation), and of virtual cameras, light sources, materials, etc. It is a 3D scene that we see in the TV output window and in the Render Preview window (see "Application Interface" ). The video texture of the presenter received from the real camera is placed in the 3D scene.
The 3D scene is processed in real time and is displayed on the TV output monitor by means of a graphics processor that is one of the most important software modules of the application – the so-called Render. The image of the TV output monitor is doubled for the sake of convenience in a special window of the application – the Render Preview pane.
A 3D scene is created by a designer in the "3D Max" graphics editor and is exported to the format of the virtual studio (a file with the ".3d" extension).
- The HotActions application cannot create or edit 3D scenes, but it can change the location, texture, color and other parameters of its objects, switch/move virtual cameras, and control the play of animation.
Actions
Actions are "bricks" of control of behavior and objects of the scene, that form the basis of any project. During the play (execution) of an action, a set of commands of a special script is executed, in the result of which different changes in the scene take place: change of cameras, launch of animation, assignment of textures, movement of objects, execution of scenarios, etc.
- A list of actions is not available in the HotActions Live application. Actions are created/edited and their buttons are assigned in creating a project in the HotActions Full application.
Hotsets and Controllers
In opening the project, one or several large windows can be seen in the application – Hotsets, on which the so-called controllers are placed – interface interactive elements of control of the scene, scenario sequences, and different parameters. In addition to controllers, text labels can be placed on the hotsets.
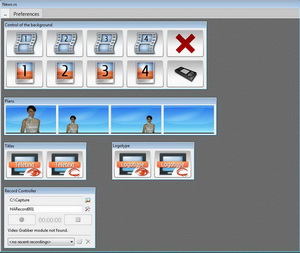
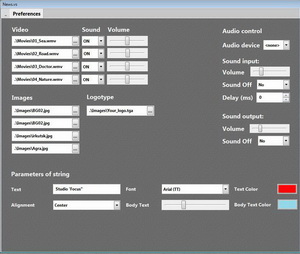
Some hotsets can contain several pages, the switch between which is performed in a standard way (like in the Windows tabulated windows).
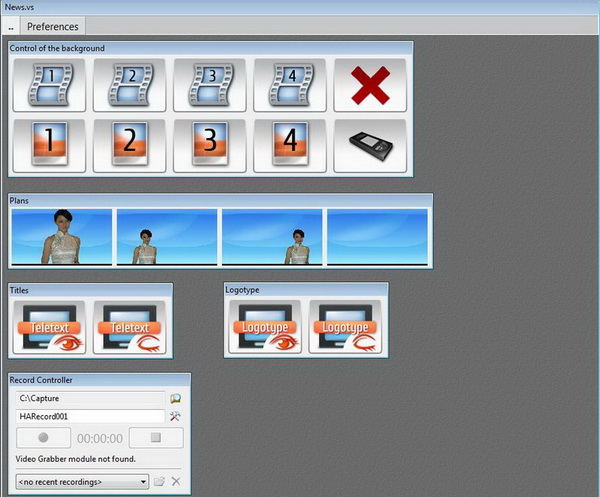
Controllers placed on the projects Hotsets can be of the following types:
Hotbar – a bar that fully consists of buttons. Buttons can have labels and images of different size and aspect.

Upon pressing each button of the Hotbar, a certain action is performed; or, more specifically, a certain Action (or a sequence of Actions) is played.
Button is a separate button of arbitrary size with a caption in the middle, without an image. Upon pressing, a certain action is performed (an Action is played).
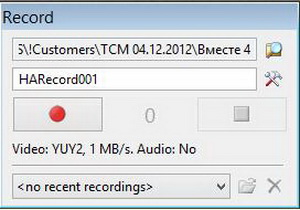
Record Controller is a window control element, by means of which the TV output of the virtual studio is recorded to the PC hard disk. Format, name and location of the video file into which the image from the TV output will be recorded can be selected in the record controller.
Media Player is a window element of control of play of different scene animation fragments (tracks) and other types of media. Its interface is a typical media player.

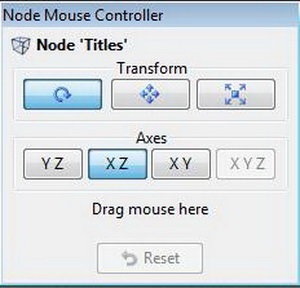
Node Mouse Control is an element of control making it possible to change the transformation (location, rotation and scale) of an arbitrary object of a 3D scene (node) with a mouse moved inside this controller.
Parameters Controllers are interface elements of input/selection/editing of the data, the assignment of which is the change of values of various parameters of the project. Most controllers are like typical Windows control elements: text input field, drop down combobox, slider, etc.
The "Presets and Parameters" chapter gives more detail on the use of controllers of the above types.
Presets and Parameters
Preset is a set of values of project parameters. Only one preset can be selected (active) in the loaded project. An active preset change results in the change of appearance or behavior of the scene, some options of the project.
Some simple projects can contain no presets.
Amount, types and purpose of parameters included in the preset depend on the arrangement of a certain project. These parameters are created by a project developer in the HotActions Full application.
Presets can be standard and user.
Standard presets are a part of the project, and a HotActions Live user cannot delete them or change values of their constituent parameters.
But it is possible to create/delete/edit one's own sets of parameters values – the so-called user presets.
- User presets are saved in a separate file – an "add-on" of the project with an extension of ".vsext" – that is in the project development folder. The name of such file always corresponds to the name of the project.
Values of parameters of user presets can be changed either in the preset editing window, or interactively in the parametric controllers located on the hotset (if it is provided for in the project)
A certain subchapter gives a detailed description of working with presets.
Keying (Rear Projection)
Keying is a software technology that makes it possible to separate the video image of an actor (presenter) from the uniform studio background (green or blue, as a rule) and to lay it onto the other arbitrary image. The result of keying is a video texture with transparency (an alpha channel) at the place of the background, which is most often used as a 3D scene object material in the virtual studio.
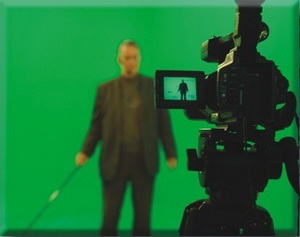
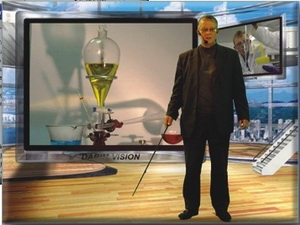
In HotActions Live, keying is set in a special dialog of "Live Video Configure".
Work with the Project
This section describes general rules of work with projects in the HotActionsLive application. The HotActionsLive software works only with one project at a time.
Opening and Closing
A project can be opened in different ways:
- Use a combination of keys <Ctrl+O>.
- If the application shows the main menu (which is hidden by default), select the File/Open command in it.
After any of these actions, a standard file-opening dialog appears, in which a required project is to be selected from the list in the folder.
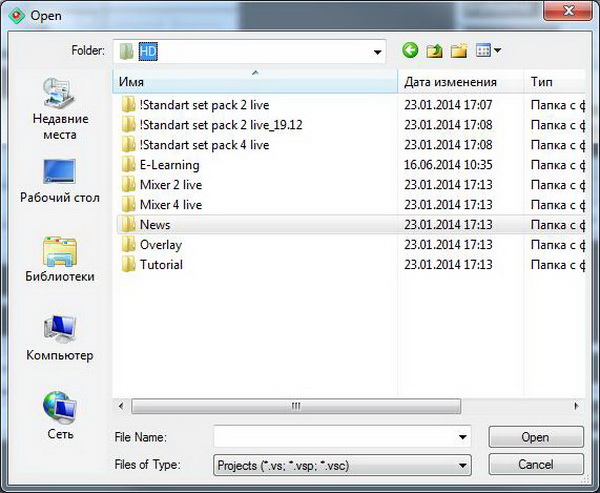
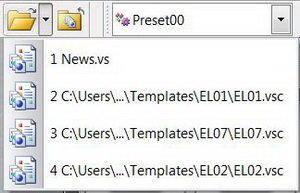
After successful opening, the project name will appear in the drop down list of the Open button (and in the main menu of File/Recent Projects), and the project can be afterwards loaded by selecting it in this list.
After the selected project is loaded, one or several windows of the project Hotsets appear in the client area of the application, and a 3D scene included in this project is displayed in the Render Preview window and on the TV-output monitor.
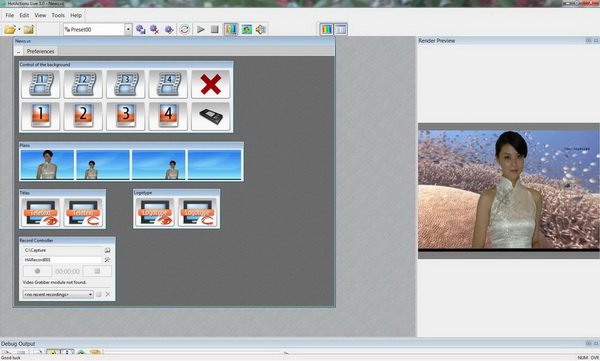
When the project is open, the Close Project command is available on the General toolbar and in the File menu, that closes the current project.
Operations with Multipage Hotsets
Some hotsets can consist of several pages. Every page has its own set of controllers. The switching between the pages is performed in a standard way: with a left click of the mouse on the page title bar (tabulator).
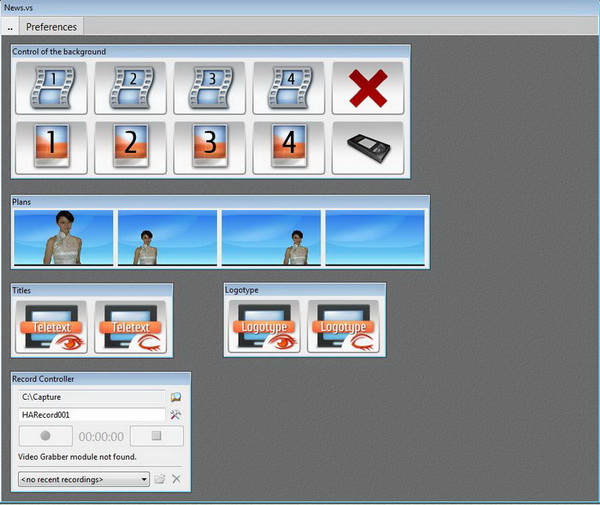
The page order can be changed by dragging the moved page by the title bar with the left mouse key and dropping in the required position.
Any page can be separated from the group, thus making it an independent child hotset. For this it is necessary to grab the page by its title bar and to drag it to the desired free space of the client area of the main window (the cursor takes the form of a "window" ![]() ).
).
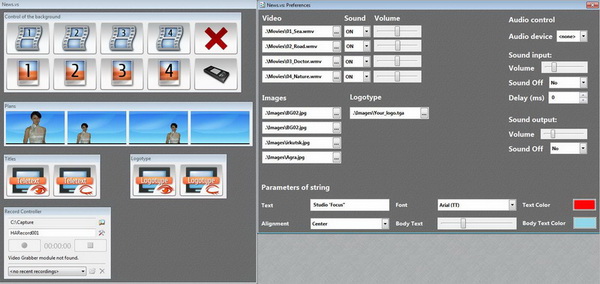
To connect the separated page back to the group, just press the «close» button (cross icon) in the right part of its window title bar.
Control of Scene Behavior and Objects
Each project is unique in its way: as a rule, it has its own set of functionalities, a 3D scene, controllers and control logic. Here it is impossible to give detailed recommendations how to control one or another project in real time – for this purpose separate supporting documents exist for each project. That's why rules of use of main types of controllers used in the project control interfaces are only given below.
Button Controllers (Hotbars)
Hotbars – button bars – are main controllers in most projects.

When an action assigned to a certain button is played for a long time, the button becomes pressed and a green "play" icon ![]() appears in its upper left corner. If the button remains pressed and the "play" icon changes to the "pause" icon
appears in its upper left corner. If the button remains pressed and the "play" icon changes to the "pause" icon ![]() , it means this button can be clicked one more time to continue the action play. When the mouse is over such button, the cursor takes the form of the "play" icon.
, it means this button can be clicked one more time to continue the action play. When the mouse is over such button, the cursor takes the form of the "play" icon.
If the button is pressed too long with the "play" icon, the action may hang. The performance of such action can be terminated by clicking its button with the pressed Ctrl key. Here the cursor takes the form of the "stop" icon ![]() .
.
Quite often it is that after being pushed the button shows the "play" icon, but the button remains pressed after that. This is normal and means that the button belongs to a radio group, i.e. a group of buttons, one of which is pressed all the time (buttons of switching virtual cameras, play of different parts of the same animation track, etc. are often combined into a radio group). Such buttons are released only after the projects is re-started.
Sometimes when certain buttons are pushed, one or several other buttons become grey and they show a red ban icon in their corner ![]() . It means that it is prohibited to press such buttons at this moment.
. It means that it is prohibited to press such buttons at this moment.

If you think that the project hangs or malfunctions please re-start the project.
Scene node controllers
Sometimes it is necessary to interactively manage the selected scene nodes with a mouse: to rotate, move, scale (in one word, to transform them). Node Mouse Control is used for this purpose:
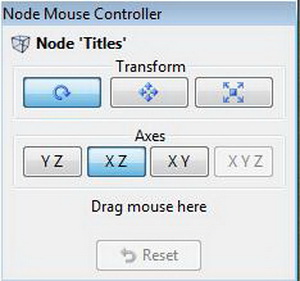
In the node controller one can select the type of transformation and the axes, along which the transformation will be performed. The name of the transformed object of the scene is displayed in the upper part of the controller. The first row of buttons allows selecting the type of transformation: rotation, move, scaling. The second row of buttons allows selecting the axes, along which the selected transformation will be performed (the axes are local in the system of coordinates of the object).
The object transformation is changed by moving the mouse with the pressed left key on the free area of the controller. Control the current position of the object visually in the Render Preview window.
Press the Reset controller button to return the object into the initial position.
Players of Animation Tracks
Controllers of the Media Player type, the interface of which is like a typical media player, are designed to play animation tracks of scene nodes.

The upper part of the controller displays the name of the scene node, the track of which it controls. The play of an animation track can be controlled by the Play ![]() , Pause
, Pause ![]() and Stop
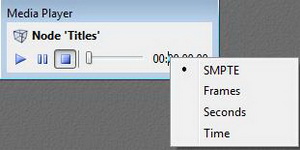
and Stop ![]() buttons. The slider allows positioning the track into a certain location. The lower right part of the controller displays the current track position in the selected time format (the time is counted relative to the start of the track). The time display format is selected in the options of the application or is selected in the context menu that is opened with a right-click of the mouse:
buttons. The slider allows positioning the track into a certain location. The lower right part of the controller displays the current track position in the selected time format (the time is counted relative to the start of the track). The time display format is selected in the options of the application or is selected in the context menu that is opened with a right-click of the mouse:
Use of External Devices
Scene objects and project behavior can also be interactively controlled by means of different external devices. These can be:
- touch screens;
- mobile devices using Bluetooth and Wi-Fi;
- different joysticks including those with gyroscopes;
- 3d mice and trackballs;
- trigger switches (GPI), etc.
The performance of certain actions is assigned to buttons of such devices, as a rule, and handles are used to change the transformation of different scene objects or to smoothly change the project parameters.
To use a number of the above devices, the additional setting of the system is required (installation of drivers, calibration, connection, etc.), and it is also required to purchase and install additional plugins in the HotActions Live application. Please contact the developers for information on the availability of such devices and plugins.
Re-Start
The project is re-started on pressing the Re-Start All button ![]() on the Tools toolbar or on selecting the Tools/Re-Start All command of the main menu or of the context menu of the application (which is opened with a right-click of the mouse in the client area of the main window).
on the Tools toolbar or on selecting the Tools/Re-Start All command of the main menu or of the context menu of the application (which is opened with a right-click of the mouse in the client area of the main window).
The sequence of re-starting a project is as follows:
- the playback of animation tracks of the scene and all types of the played media data stops, the changed scene objects (materials, nodes, etc.) are reset to the default state;
- parameter values of the current selected preset are applied;
- the special initializing action is executed (in the HotActions Live it is "invisible" for the user), which results in the reset of the visual state of the scene.
Main Scenario Control
A project can have the Main Scenario that can be controlled by means of the Play/Continue Scenario ![]() and Stop Scenario
and Stop Scenario ![]() buttons of the Tools toolbar.
If a project has no main scenario, the buttons of scenario control are inactive (grey). The availability, character and duration of the main scenario depend on the creators of a certain project.
buttons of the Tools toolbar.
If a project has no main scenario, the buttons of scenario control are inactive (grey). The availability, character and duration of the main scenario depend on the creators of a certain project.
- A user of HotActions Live cannot create or edit the main scenario of the project.
The corresponding commands of the main or context menus of the application or the following key combinations can be used as an alternative control of the main scenario:
- <Ctrl+Enter> - play/continue the scenario;
- <Ctrl+Space> - stop the scenario.
Operations with Presets
Selecting a Preset
Preset of any type – user or standard can be selected (made active). When selecting another preset, the project parameters acquire a different set of values. As a rule, most parameters result in visual changes in the scene only after the project is re-started (see below).
A preset is selected in the drop down list of Presets of the Tools toolbar. If the project contains no presets, this drop down list is empty.
Creating a New Preset
A user of HotActions Live can create only user presets. Current values of all parameters of the project are saved in the new preset.
To create a user preset, it is necessary to use the New Preset command that is located in the end of the drop down list of the current preset selection. After this command is selected, a dialog to enter the new preset name appears.
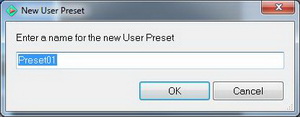
The created preset becomes current, and its name appears in the list of the preset selection. The created user presets can be subsequently re-saved, deleted, and their parameters can be directly edited.
Saving and Deleting a Preset
User Presets can be saved and deleted by means of the Save Selected Preset ![]() and Delete Selected Preset
and Delete Selected Preset ![]() buttons of the Tools toolbar, with the current selected user preset being saved or deleted. If a standard preset is selected, these buttons are inactive.
buttons of the Tools toolbar, with the current selected user preset being saved or deleted. If a standard preset is selected, these buttons are inactive.
When a current preset is saved, the current values of the project parameters are memorized in it.
Editing Preset Parameters
Editing values of parameters saved in the preset is allowed only for user presets.
To edit the preset parameters, use the Edit Preset Parameters button ![]() that is located on the Tools toolbar.
that is located on the Tools toolbar.
After pressing this button, a dialog to edit the preset appears:
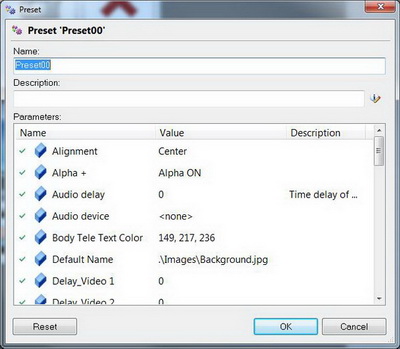
The main part of the dialog is occupied by the list of parameters, the values of which are saved in the edited preset.
Please note that a user of HotActions Live cannot create new or delete existing parameters of the preset, but can only change their values.
Parameter values are edited in the second column of the list of this dialog. Click the cell of the current parameter value with the mouse. Depending on the type of the parameter, a corresponding value-editing controller will appear in the cell. Possible types of parameters and corresponding value-editing controllers are given in a table below:
After the value is entered, switch the mouse focus to another element, to fix the entered value. On pressing the OK button, the changed parameter values are saved in this preset.
Interactive Modification of Project Parameters
Some projects can contain parameter controllers on the hotsets, that make it possible to directly change values of the project parameters (most important, as a rule). All possible types of controllers are described in the previous paragraph «Editing Preset Parameters». The view of controllers (color, font, size) can be different in different projects.
| string-type controller | |

|
a file-type controller |
| a slider-type controller |
- A user of HotActions Live cannot change names and types of parameters that are tied to them.
As a rule, it is necessary to re-start the project (see above) to apply the new parameter values (visual or functional changes in a 3D scene). However, there are parameters, the interactive change of values of which results in immediate changes in the scene, without a re-start.
The changed values can be saved in user presets, using the above commands of work with presets New Preset or Save Selected Preset (in the latter case, parameter values in the current selected preset are updated). When parameter values were changed in the process of work with the project, but a user preset was not saved, a user is offered to save the new preset when exiting the HotActions Live.
Encryption Key Export
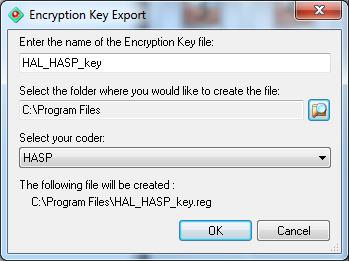
Remote developers can create individual commercial projects for users of HotActions Live. These projects are encrypted for a certain user (by means of the HotActions Full application) in order to protect them from unauthorized use. For a project developer to encrypt a project for a certain user of HotActions Live, it is necessary that the user send his individual encryption key to the developer, that is a text file of record to the system register. The developer adds the saved file to the register of his system to encrypt the project.
The encryption key is saved in the Encryption Key Export dialog that is invoked from the Help main submenu with a corresponding command.
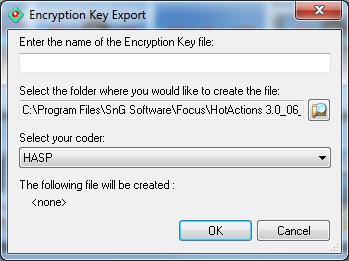
Name and location of the file with the exported data are selected in the dialog.
If alternative systems of data encryption are used, it is necessary to select the desired coder in the drop down list Select your coder. Two encryption systems are available: HASP (encryption with a USB key) and FDxxx (encryption with a media board).
A full path to the saved file with the key is displayed in the lower part of the dialog.
Record of TV-Output Video
If the studio contains a record plugin, HotActions Live can record the result of the 3D scene rendering (a current video signal from the TV-output) into a standard video file of the MPEG type. A special controller is designed for this purpose:
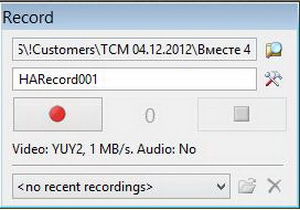
A folder, in which the recorded video files will be saved, can be selected in the upper part of the controller by pressing a button with the «explorer» symbol ![]() .
A name of the video file with a formatted number in the end can be specified in the next line. At every next record, the number in the end of the name will increase by one. The amount of signs in the number depends on the amount of zero’s entered in the name (i.e., if an initial name of "Name0001" is specified, the amount of signs in the file number will be not less than four).
A "record options" calling key
.
A name of the video file with a formatted number in the end can be specified in the next line. At every next record, the number in the end of the name will increase by one. The amount of signs in the number depends on the amount of zero’s entered in the name (i.e., if an initial name of "Name0001" is specified, the amount of signs in the file number will be not less than four).
A "record options" calling key ![]() is located in the right part of the field to specify the name of the recorded file. If pressed, the following dialog appears:
is located in the right part of the field to specify the name of the recorded file. If pressed, the following dialog appears:
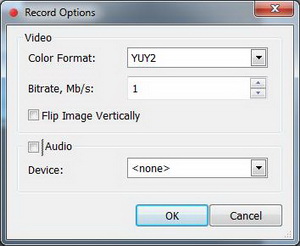
The following parameters can be set in this dialog:
| Color format | Selecting a color format of the MPEG file (YUY2 or RGB) (see literature on the MPEG format). |
| Bitrate, MB/s | Selecting a video stream speed, in megabytes per second. The greater the specified value is, the higher the quality of the recorded video is, which results in an increase of the disc size of the file. |
| Flip Image Vertically | An option to flip the recorded video vertically. |
| Audio | A check box, selection of which specifies whether to record or not the audio track into the video file. |
| Device | If the record of audio into the video file is selected, it is necessary to select in this drop down list an audio device, from the output of which the record will be performed. |
The Record and Stop buttons control the process of recording into the selected file. An indicator of the current record time is located between these buttons. The time format is specified in the options of the application or is selected in the context menu called with a right-click of the mouse:
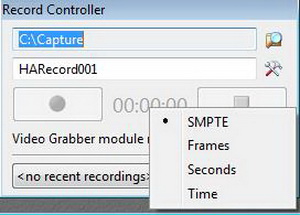
The status bar displays the current selected record options.

Attention! If the status bar displays a caption "Video Grabber module not found", you need to purchase the corresponding video record module, applying to the system developers.
Elementary operations with the files that are already recorded can be performed in the lowermost part of the controller: open them for playing in the system media player ![]() or delete
or delete ![]() them . A file is selected in the drop down list.
them . A file is selected in the drop down list.
- Please note that the list contains files recorded from the moment of the start of the application. If you want to delete or to play the file recorded at the other time, use the standard Windows Explorer, selecting the required folder in it.
Application Interface
Toolbars
The main window of the HotActions Live application contains in its upper part four toolbars with command buttons and menus including standard commands of opening projects, loading and editing presets.

A picture above shows all toolbars, however, the General and Tools toolbars are shown while the Main Menu and View toolbars are hidden by default in the HotActions Live application. To show/hide any toolbar, right click the free area of the toolbar baseplate in the upper part of the main window and select/deselect the check box against the required name.

Toolbars can also be shown/hidden through the View/Toolbars main menu. Any of the toolbars docked to the main window can be made "floating", if dragged with the left mouse button by the ribbed vertical strip on the left and dropped at the desired place. The toolbar takes the following form:

Pressing the «close» button in the title bar of the floating toolbar hides the toolbar.
The contents of each toolbar are described below.
Main Menu
The toolbar menu, many commands of which are replicated by buttons of other toolbars. It is hidden by default. It consists of five drop down menus.
Drop Down Menu «File»
This menu contains commands to control the project and other documents.
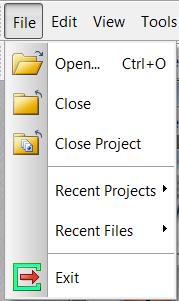
| Open... (Ctrl+O) | to open a project |
| Close | to close an active document (file) |
| Close Project | to close the project |
| Recent Projects | list of latest opened projects |
| Recent Files | list of latest opened documents (files) |
| Exit | exit from the application |
Drop Down Menu «Edit»
Contains commands for editing the text or a list of objects (if allowed within the context of working with the project.)
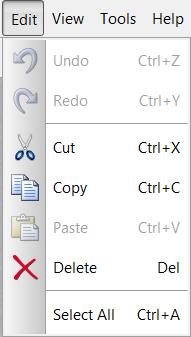
| Undo (Ctrl+Z) | undo the last operation |
| Redo (Ctrl+Y) | redo the last undone operation |
| Cut (Ctrl+X) | remove text/object to the clipboard |
| Copy (Ctrl+C) | copy text/object to the clipboard |
| Paste (Ctrl+V) | paste text/object from the clipboard |
| Delete (Del) | delete text/object |
| Select All (Ctrl+A) | select whole text or all objects |
Drop Down Menu «View»
Manages displaying/location of toolbars and dockable panes in the main window of the application.
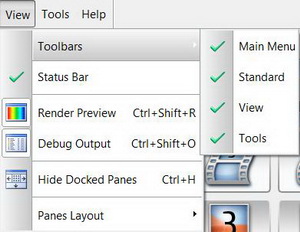
| Toolbars | drop down menu to show/hide toolbars |
| Status Bar | shows/hides the status bar in the lower part of the main window of the application which is used to display system messages |
| Render Preview (Ctrl+Shift+R) | shows/hides the docked pane Render Preview |
| Debug Output (Ctrl+Shift+O) | shows/hides the docked pane Debug Output |
| Hide Docked Panes (Ctrl+H) | hides all visible docked panes |
| Panes Layout | discards location of all docked panes to the default condition (does not refer to the toolbar location) |
Drop Dow Menu «Tools»
Contains main commands for project management and for displaying dialogs of different program options.
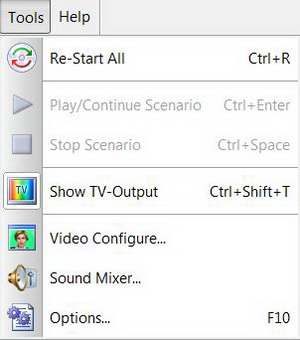
| Re-Start All (Ctrl+R) | Restarts the current project |
| Play/Continue Scenario (Ctrl+Enter) | Launches or continues playing the main project scenario (if available) |
| Stop Scenario (Ctrl+Space) | Stops the played main project scenario (if available and launched) |
| Show TV-Output (Ctrl+Shift+T) | Turns on/off the television output of the virtual studio (rendering to the second monitor) |
| Video Configure | Invokes dialog of video output and keying options |
| Options (F10) | Invokes application setting dialog |
Drop Down Menu «Help»
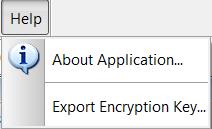
The About Application command shows a message with information about the current application version and downloaded components.
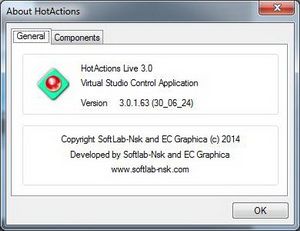
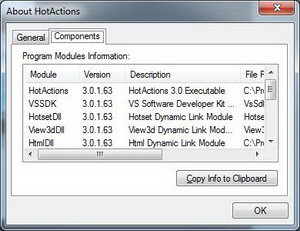
The Encryption Key Export command opens the dialog to save an individual encryption key of the current user of HotActions Live (described above).
Toolbar «General»
Buttons of the General toolbar duplicate commands for document management: Open Project and Close Project.
The drop out menu of the Open Project button (arrow on the right) shows a list of previously opened projects (duplicates the main menu File\Recent Projects.
Selection of one of the recent projects opens it in the application.
Toolbar «View»
View toolbar buttons have commands responsible for displaying/hiding the dockable panes:
| display/hide the Render Preview pane | |
| display/hide the Debug Output pane |
Toolbar «Tools»
Tools toolbar buttons have commands of operations with presets and duplicate some commands of the Tools main drop down menu that are responsible for the project management and for displaying dialogs of various options.
Dockable Panes
In the HotActions Live application, the Render Preview and Debug Output windows are referred to dockable panes. It is possible to do the following operations with the dockable panes:
- hide/show;
- move, change the size;
- dock to different sides of the main window (except the upper one);
- undock, changing them to so called “floating” mode (in this case the toolbar can be taken beyond the main window boundaries of the application);
- maximize, if the pane is in the floating mode;
- expand to the whole bar, if the pane is docked to the main window and has neighboring panes.
To move it, it is necessary to grip the title bar with the mouse and move it to the desired place. Each pane has its context menu that drops down after the right click on the title bar of the pane:
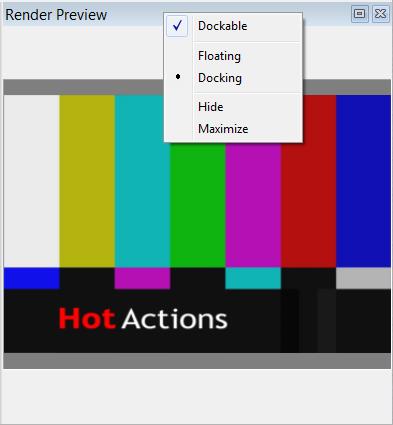
| Dockable | If the option is turned on, the pane can be docked to the main window. Otherwise, the pane can be only in the floating mode. |
| Floating/Docking | Commands of pane docking mode selection |
| Hide | Hides the pane (it can be opened again through the main menu View / <Pane Name>, or with the help of the respective button on the View toolbar |
| Maximize | Expands the pane to the whole screen, if the pane is in the floating mode; or to the whole bar, if the pane is docked to the main window and has neighboring panes. |
It is possible to quickly expand the pane, having pushed the ![]() button on the pane title. Using the neighboring close button
button on the pane title. Using the neighboring close button ![]() , one can quickly hide the pane.
, one can quickly hide the pane.
Pane «Render Preview»
The result of rendering the 3D scene included in the project is replicated in real time in the client area of the Render Preview pane (it is implied that the main output is to the TV-output of the studio, that is, as a rule, on the second monitor, see "Basic Terms").
If no scene is downloaded, this window shows a setup scene with colored stripes. The picture of this scene is taken from the EmptyRender.bmp graphic file located in the software subdirectory\Program Files\SnG Software\Focus\HotActionsLive\Common\Images. Replacement of this file with another bmp-file with the same name will result in changing of the default picture.
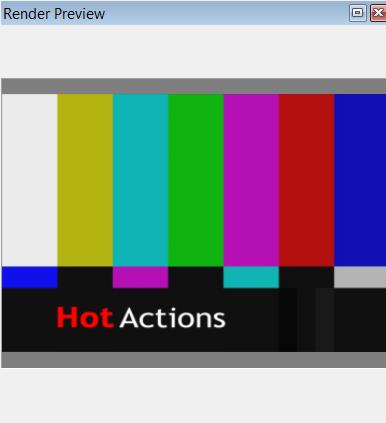
The right button click on the client region of the Render Preview window invokes the context menu:
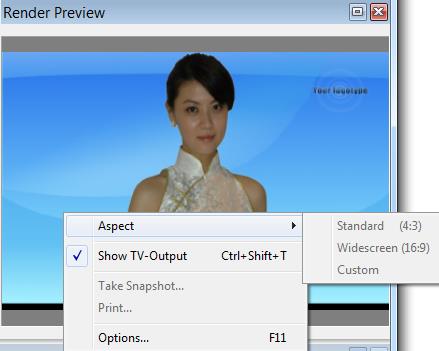
| Aspect | Commands of this sub-menu make it possible to choose the Standard (4:3), Widescreen (16:9) or Custom aspect of image output in the window. When choosing the Custom option, the image aspect corresponds to the window aspect (i.e. the image always fills up the window.) |
| Show TV-output | Turning on/off of the TV-output on the second monitor. |
| Take Snapshot | Saves the current 3D-scene image as a graphic .bmp file. Upon choosing this command, the standard dialog for saving a file opens, where it is necessary to select or specify the name and location of the file with the snapshot. |
| Print… | Sends the current 3D-scene image to the printer. When the command is selected, the standard Windows dialog of print options is opened. |
| Options… (F11) | Invokes the Render options dialog (for more detail, see FOCUS Video Tuning.) |
Pane «Debug Output»
The HotActions Live application outputs diagnostic messages of various types: errors, warnings, executed commands and other types of information. These messages can be especially useful to the users and developers when some nontypical situations or problems in operation are uncovered. To output such messages, the panel Debug Output is used.
This panel is hidden by default, but it can be displayed with the help of the View\Debug Output command in the main menu, or with the help of the button Debug Output in the View toolbar, or by the combination of keys <Ctrl+Shift+0>.

Messages are displayed in the form of a scrollable list in the client part of the panel. Every message has an icon representing its type. The main types of the displayed messages are as follows:
Other (special) types of displayed messages can be selected in the dialog of the application options (F10) on the Debug Output page.
- Independently of the fact, whether the Debug Output panel is shown or hidden, messages of all selected types are continuously recorded in a special HotActions.log logfile that is located in the system folder for temporary files of the current user. The messages are started to be recorded in the logfile from the application launching.
There is a toolbar with the following buttons in the upper part of the panel above the list of displayed messages:
![]() Copy. It copies the messages selected in the list into the text clipboard.
The lines are selected in the standard way: using the left button of the mouse with the help of keys Ctrl or Shift (like during the work with files in the Explorer in Windows). To select all messages in the list, the combination <Ctrl+A> is used.
Copy. It copies the messages selected in the list into the text clipboard.
The lines are selected in the standard way: using the left button of the mouse with the help of keys Ctrl or Shift (like during the work with files in the Explorer in Windows). To select all messages in the list, the combination <Ctrl+A> is used.
![]() Clear all. To delete all displayed messages in the list. In this case, messages from the HotActions.log logfile are not deleted.
Clear all. To delete all displayed messages in the list. In this case, messages from the HotActions.log logfile are not deleted.
![]() Find. To find the set line in the message list. After this command is chosen, a standard dialog of text fragment search appears.
Find. To find the set line in the message list. After this command is chosen, a standard dialog of text fragment search appears.
![]() Output Warnings. To turn on displaying messages with warnings.
Output Warnings. To turn on displaying messages with warnings.
![]() Output Info. To turn on displaying messages with various information.
Output Info. To turn on displaying messages with various information.
![]() Output Runtime. To turn on displaying messages from the played actions.
Output Runtime. To turn on displaying messages from the played actions.
![]() Output Script. To turn on displaying commands of the executed script.
Output Script. To turn on displaying commands of the executed script.
![]() Enter Script Command. It is possible to directly enter a script command in this element for the execution (used for testing and debugging), or to select it from the list of recent commands.
Enter Script Command. It is possible to directly enter a script command in this element for the execution (used for testing and debugging), or to select it from the list of recent commands.
![]() Run Command. To execute the script command entered in the previous field (combo box).
Run Command. To execute the script command entered in the previous field (combo box).
Right button click on the message list calls up the context menu:

| Show Columns | Commands from this sub-menu make it possible to choose viewing in the list of additional columns:
|
| Copy (Ctrl+C) | See command Copy of the panel toolbar. |
| Clear All (Shift+Del) | See command Clear All of the panel toolbar. |
| Find… (Ctrl+F) | See command Find of the panel toolbar. |
Application Options
The main menu command Tools\Options…, or pushing the F10 key calls up the Options dialog containing three pages.
Page «General»
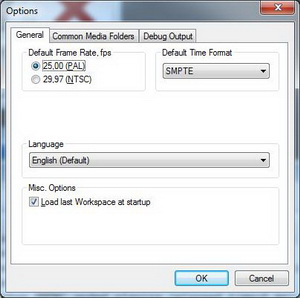
It is possible to change the following options in the General page:
Page «Common Media Folders»
In some cases, not full file paths to media data but only file names are provided in different executed script commands. In such cases, media files are searched by name as follows:
- in the list of files connected to the project;
- in the local folder of the project and its subfolders;
- in the folders, the paths to which are prescribed inside the project;
- in the folders specified on the Common Media Folders page of the Options dialog.
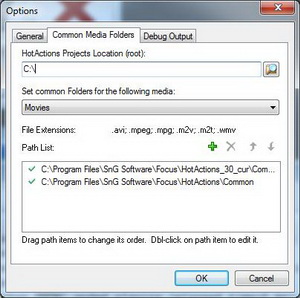
As a result, it is possible to assign folders on the Common Media Folders page for the storage and search of various media types that can be used simultaneously in different projects. As a rule, media data in these folders are not included in the packed projects, as they can occupy some significant volume of the disc space.
It is possible for the sake of convenience to choose the root folder in the HotActions Projects Location(root) field to store HotActions projects. This folder will be used by default as the initial one in the file dialog of opening the project.
The type of media is chosen in the Set common Folders for the following media dropdown list, for which the list of folders located below will be edited.
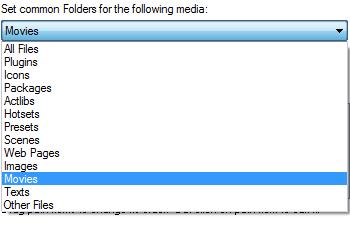
In the edited list Path list, it is possible to add or delete paths to folders for media data, the type of which is chosen in the dropdown list above, and to change their order. These operations are done with the help of command buttons in the upper right part of the list ![]() , or with the help of the context menu called up on the free or occupied part of the list.
, or with the help of the context menu called up on the free or occupied part of the list.
Also, the chosen path can be changed by using the Edit command of the context menu or the F4 key. The standard folder selection dialog will appear.
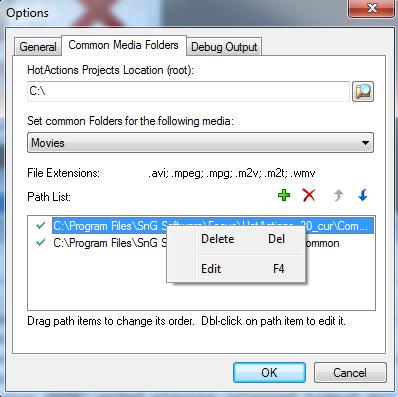
The order of the folders in the list determines the sequence of file search in them (i.e. files will be searched in the upper folder first.) The same folders can be assigned for different types of media (i.e. it is not necessary to try to assign unique paths for each type.)
Page «Debug Output»
On the Debug Output page of the options dialogue, one can choose extended types of messages shown in the logfile of the Debug Output panel.
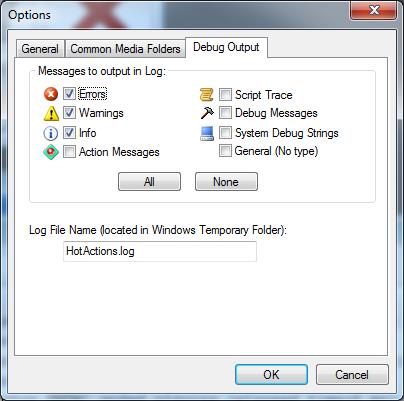
The checkbox against the chosen types of messages to be shown in the log is selected/deselected. Please note that in addition to the main types of messages, it is possible to choose Debug and System messages that are mainly needed by developers for debugging and troubleshooting of the application. Other types of messages are also needed to debug the system
Buttons All and None make it possible to simultaneously select or deselect all types of messages.
The Log File Name input field makes it possible to set the log file name to record messages of chosen types into the file (by default - HotActions.log). The text file with such a name will be created in the Windows folder for temporary files of the current user (the path to this folder can be seen in the Window system settings.)
Independently of the fact whether the Debug Output panel is shown or hidden, messages of the chosen types will always be recorded in the logfile. In the case of problems, this logfile can be sent to people on the project or the application developers to facilitate the search of their possible causes.
Conclusion
If you liked HotActions Live and if you want to create your own unique projects, don’t hesitate to purchase the full version of the application - HotActions Full 3.0 that has truly unlimited functionalities!
We wish you successful work!
Developers of the HotActions product line.


