Tracking in All¹Mix for PTZ cameras via FreeD protocol
General provisions
FreeD – protocol ensures pan/zoom synchronization of a real PTZ camera and a virtual camera in a 3D scene. This allows All¹Mix to be used as an augmented reality (AR) system.
The image from the PTZ camera is projected onto a special 3D scene object. Those. texture coordinates are "cast" from the virtual camera to this object (Camera Mapping) in each frame, and the diffuse texture of the object's material is replaced by the video stream from the real camera
All¹Mix currently supports AR mode with Panasonic AW-UE100 and AW-UE150, Sony BRC-X1000, Lumens VC-A71P cameras.
Requirements for 3D scene for All¹Mix to work in Augmented Reality (AR)
3D scene must contain a special object (usually planar, but not required) that must be in view of the virtual camera during (synchronous with PTZ) rotation in the working range of angles. Generally, a special object is located in the background relative to other objects in the scene.
This object must be assigned a material with any initial diffuse texture. The material name must begin with a "!" character. Upon detection of material with the sign "!" All¹Mix enters AR mode (in which the texture coordinates of an object with the same material name must be assigned in each frame in a special way (Camera Mapping). It is recommended to set the material self-luminosity to 100.
Important: Only those objects whose name (or/and the name of the material) begins with the @ symbol are added to the list of 3d scene objects available for editing. In our case, the special object material name must start with two characters. For example: !@Reality
Signs "@", "!" does not appear in the All¹Mix interface. For example, the object name @ObjectName will be displayed as ObjectName.
Setting up a project to work with AR 3D scene All¹Mix
- add video from the PTZ camera to the slot and enable PTZ control
- load the scene into another slot and assign the video from the camera to the material texture of the special (AR) object
- Tracker on/off parameter should appear in the texture properties of a special object (for example, with the name 'Reality')
- if Tracker is on, then tracking settings appear:
Tracking settings
- Tracker Port - must be the same as in the camera settings
- Tracker Parallax - allows you to select a correction for the shift of the rotation center of a particular PTZ camera
- Tracker Offset - changes the initial angle shift between the virtual 3D camera and the real PTZ camera horizontally and vertically
- Tracker Delay - allows you to set a time delay
![]() Allows you to download the FOV-ZOOM calibration file
Allows you to download the FOV-ZOOM calibration file
![]() Calls up the calibration settings dialog.
Calls up the calibration settings dialog.
![]() Reset tracker calibration - when clicked, a default calibration curve is generated.
Reset tracker calibration - when clicked, a default calibration curve is generated.
Calibration Dialog
- points on the chart can be edited by drag and drop
- if you click on any point, the PTZ camera starts sending commands to control the zoom speed until the desired zoom value comes from the camera
- the graph has a highlighted moving point showing the current state of the camera
- the schedule is saved when saving the project
Hardware setup (on the example of Panasonic AW-UE100)
Go to the camera settings page
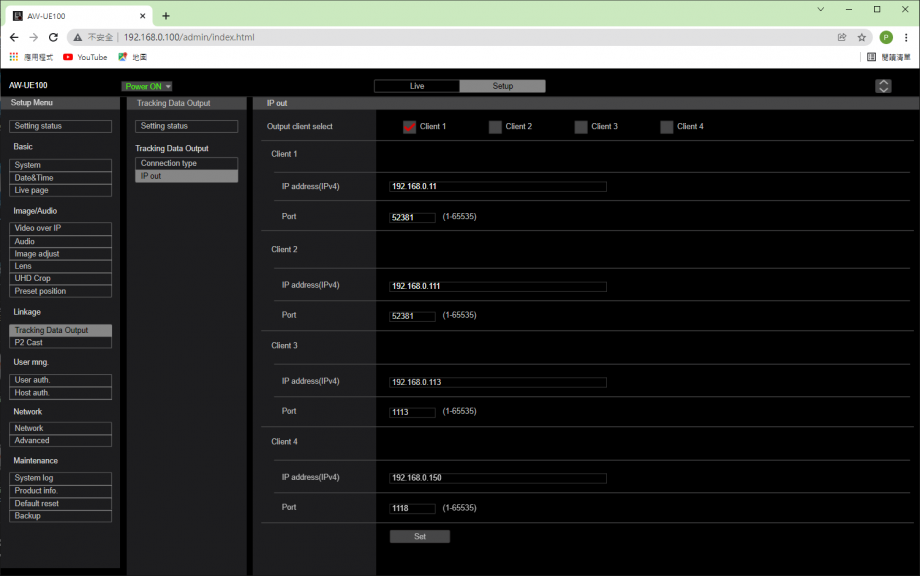
- Choose: Setup / Tracking Data Output / IP Out
- Tick at least one client, for example Client 1
- Assign the IP address of the computer on which All¹Mix is installed to the selected client
- Assign some Port to the selected client, for example 52381
- Press the Set button
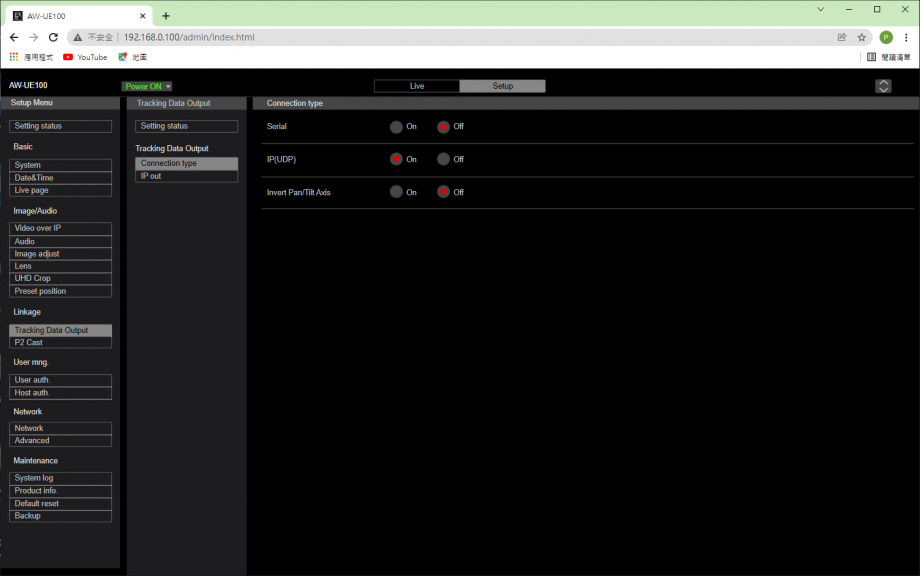
Go to the Setup / Tracking Data Output / Connection Type page and set the mode to IP(UDP)
Run FDConfig2 and set the frame rate to the same as the FreeD camera
On all monitors, set the frame rate to the same as the FreeD camera
Example of working with AR-project All¹Mix
Run AllMix project Tracking.mixer in presentation mode (F3)
- Assign a camera from the Live FD Boards list to Slot 8
- Go to Slot 8 editor and enable PTZ Controller
- In the address field, select the desired camera from the drop-down list
Go to the Slot 9 editor, where the 3D scene Tracking.fbx is located
Find a special object (Reality) and assign:
- Input=Slot8
- Tracker=On


